ID & Tuning AFX Super Magna-Traction/Speed Shifter/Blazin’ Brakes & Cat’s Eyes
This guide was originally published on www.SlotCarIllustrated.com by user JimDouglasJr
at http://www.slotcarillustrated.com/portal/forums/showthread.php?t=92287&highlight=blazin+brakes
A while back I was browsing some older topics on these with incomplete and misinformation, so thought I'd write up something comprehensive on this chassis, especially for the novice owner. Whether you've acquired one in a lot or actively seek them, they are twitchy from the factory but can be very good performers with a few easy tweaks and no special tools or know-how. Read on.
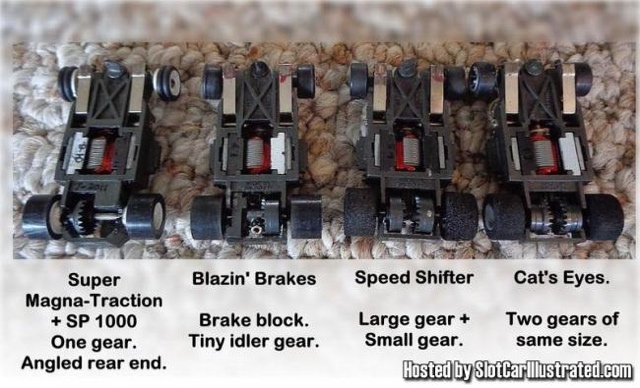
Aurora AFX Super Magna-Traction/Speed Shifter/Blazin’ Brakes and Cat’s Eyes (Turn-ons) chassis. Also known as the SP 1000 (and briefly, SP Fast).
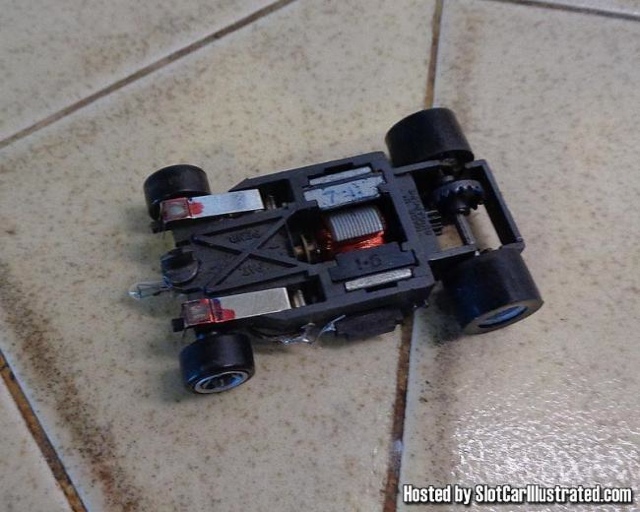
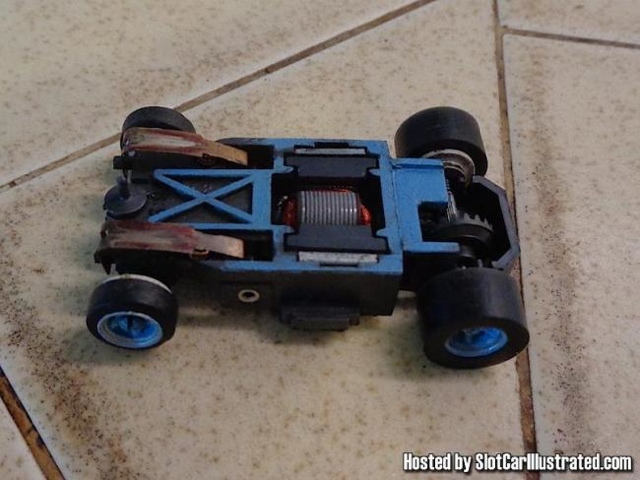
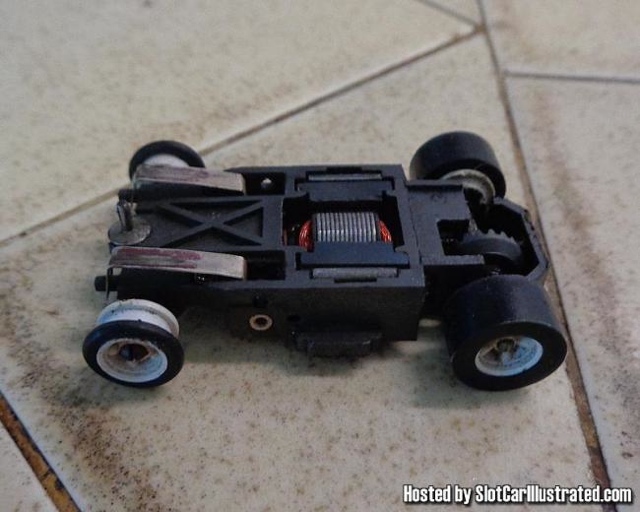
All are easily identified by the "X" reinforcement on the bottom. Although they share some parts, they are NOT a G-Plus.
History and overview.
First offered around 1978 as a high performance, lower cost alternative to the G-Plus, the Super Magna-Traction was soon re-engineered and adapted for several specialty roles. Due to riding slightly higher, they are often faster than a G-Plus.
Aurora did next-to-no advertising of the Super Magna-Traction. They're completely overlooked in their consumer catalogs other than as the SP Fast in 1982. There's no evidence they were ever packaged as such.
As an inline, they are often mislabeled as a G-Plus, but they differ significantly although they do share some G-Plus parts. The pan, electrical pick up system, motor bearings, flux collectors, front wheels (larger hole), and sometimes the rear wheels differ.
This chassis is my favorite under-rated, overlooked chassis and the tips here will eek out higher performance and maybe more importantly, longer shoe life, as these shoes are out of production. Don’t panic, NOS shoes are still around and other shoes are easily adapted (discussed here).
These tips are for the novice to intermediate racer. Advanced racers already know these tricks and can play with different armatures and rear wheel/gear setups. The armatures and brush tubes are extremely easy to remove and replace in this chassis.
What each variation is and how it works.
All of the variants do something via reversed polarity and some sort of pinned slip clutch/es on the rear axle. The motor reverses and...
...the Blazin' Brakes chassis presses the block on the axle against the chassis for brakes. The tiny idler facilitates. The light bulb is run through a diode and the brake light comes on.
...the Speed Shifter has two different sized gears on slip clutches. High and low gear. A fun consequence of this is that the car will run on the track in the other direction. They run natively in high gear with a regular controller, but can be amped up by reversing the magnets to run in low.
...Cat's Eyes/Turn Ons have two of the same sized gears on slip clutches, and a light bulb on a diode. Reversing polarity turns the light bulb on. They also run both directions. Natively, with the light bulb off.
This will seem like a lot to read, but you can do all of this to a chassis in about 10 minutes.
Now, before we get to the rest, let’s get this out of the way…
Speed Shifter Gearing.
The very first issue we’ll address is the Speed Shifter gearing for use with regular track and controllers, since it’s the easiest. The Speed Shifter is identified by a large and small gear on the axle (so you can shift from low to high). It runs natively in high gear, fine for long straightaways, but can rob the car of torque. If you find this the case, simply remove and reverse the magnets to run it in low gear on smaller home tracks. It'll really let the motor wind up, still be fast, and respond better. A fun fact: These will run in the opposite direction if you turn the car around. Tons of potential fun right there.
Pick Up Shoe Spring Force.
This chassis' main flaw, excessive spring action on the pick ups, is easily corrected. These chassis use the same springs as the G-Plus, but the shoes are shorter, which changes the geometry. The spring wells should have been 1 mm to 2 mm deeper.
You’ll notice that if you turn the car about 30° off track center, the shoes will push the front wheels off the track. This leads to deslotting in a slide and is what makes these cars twitchy; flying along the track one second, through the air the next.
One thing I hate to do is cut something vintage, but shortening the springs will fix this.
If you decide on cutting, remove one loop at a time, with two really being the maximum. Be sure to place the cut side in the spring well as the finished side rides on the shoe better.
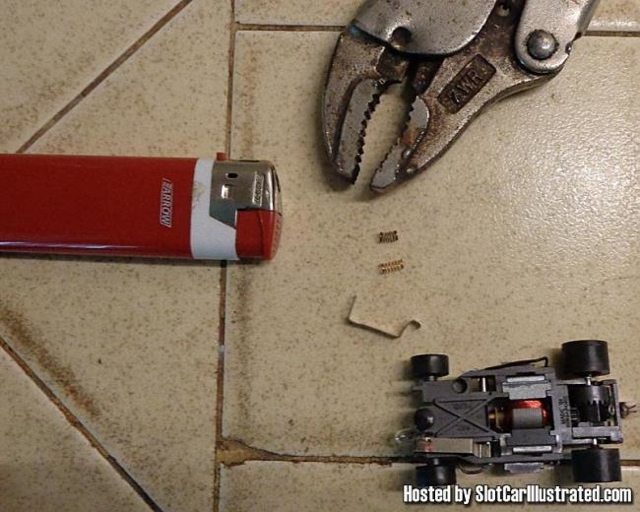
If you decide you don’t want to cut, which is what I did, the springs can be shortened with nothing more than a pair of vice grips and a lighter.
The springs are about 6 mm long. I compressed them about 2 mm using the very lower corner of the jaw. Then simply wave the lighter under it for a few seconds until it drops out. If it doesn’t drop out, don’t overheat it. Simply open the jaws and it should drop out. When reinstalling, there will likely be an angle on the end coil. Put the tall side towards the forward part of the chassis to match the natural angle of the shoe.
Note reduced spring nearer vice grips, as stock spring nearer shoe. Heating does weaken the spring some, so resist compressing them.
(Photo of springs, lighter, loose)
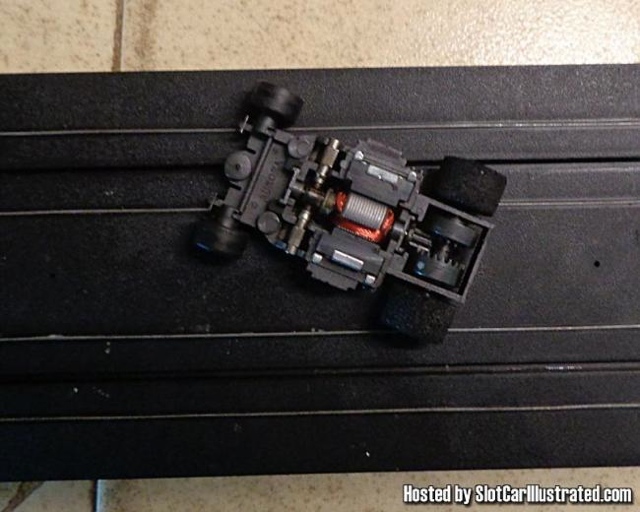
Test: Turn the chassis about 30° off center (magnets not over rails) and see if the front lifts up. I settled on a very slight (or no) hairline lift with the body off, and none with the body on. You don’t want to over-do it or you risk losing enough tension to maintain good shoe contact with the motor brush tubes. Run the car a few laps to be sure everything's right and the car doesn't stutter.
They're fairly forgiving and you can slightly stretch the springs back out if necessary.
Note magnets not over rails.
(Photo of chassis on track)
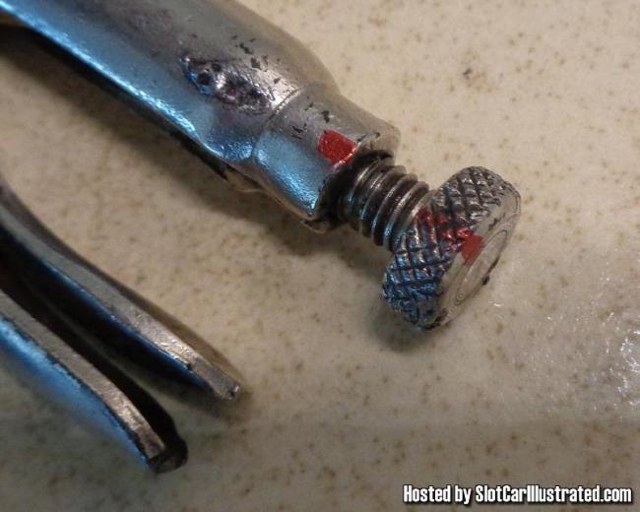
If you’re happy with the result and need to do several cars, you can mark your vice grips.
(Photo of vice grips)
Important Shoe Adjustment (all HO slot cars). The second shortcoming of this chassis is the pick up shoes with tiny steps.
The reduced downward force from spring reshaping on the shoe will have the added effect of increasing shoe life.
However, it’s still important to make double sure those tiny steps are riding flat on the rails. These shoes are prone to going out of adjustment when removing or installing them.
I use a short piece of track and a bright light to inspect for gaps. As much difference as this makes on other shoes, it’s extra important on these. Well adjusted shoes will last many times longer. Color the step with a red or blue Sharpie, run a few laps, check wear pattern.
Photo: Well adjusted shoes. Nice even contact pattern on the step.
(Photo detail of shoes)
Alternate Shoes.
1. Early style Tyco Magnum 440 non-step shoes with the spring retainer wings cut/broken off will work with a little coaxing and provide a lower profile and about 300% more rail contact. They are still easy to find and not expensive.
I have never tried this with the stepped 440 shoes, I’m sure it can be done although you may want to mostly flatten the step with your needle nosed pliers.
2. Update: Thanks to andyw724 for this. It seems that Tomy AFX Mega-G short wheel base shoes (with the brush tube hanger) and their springs work very well with virtually no fuss.
3. Regular Magna-Traction shoes can also be formed into Super Magna-Traction shoes if you’re handy.
Photos: 1) Tyco 440 shoes and 2) heavily modified AFX Magna-Traction shoes.
I have been running this car with the Tyco shoes for 25+ years. The deep grooves in the fronts were already there as the shoes were used. There's barely any wear otherwise.
(Photos of various shoes)
Magnets and Flux Collectors.
Advantage: By the time this chassis was released Aurora's magnets were strong and well matched. Earlier G-Plus chassis often suffered from one weaker magnet. Great sources of well matched and strong magnets are the Speed Steer and Blocker chassis, often found NOS. Magnet pairs with one painted white are almost universally strong and well matched.
Disadvantage: Slightly smaller flux collector and often less precise placement than on the G-Plus.
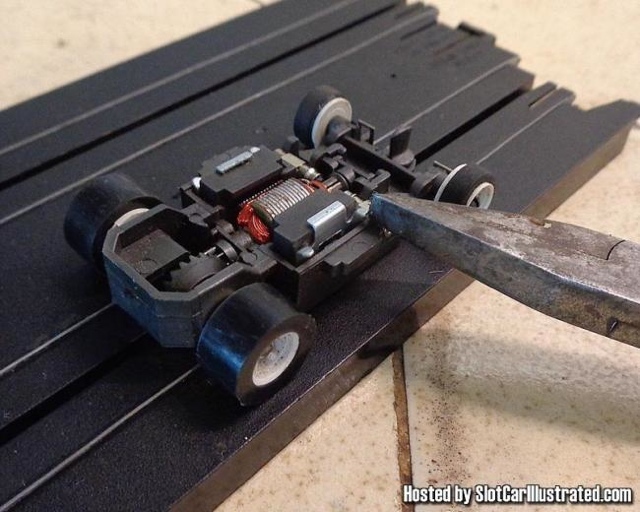
The slightest difference in distance from the rails can seriously affect the effect of the collector. The flux collector should be positioned just a hair above the bottom of the chassis, or possibly flush if you can get away with it. This chassis can flex while in use, and flush with the bottom while stationary may be too far depending on the brand of track/rail height and tire choice. They can be pulled further out while running and their attraction is increased.
To lower the magnet and collector, push them slightly up/out and bend the two tabs on the top of the collector up 20-30°. Some of the collectors have retainer clips built in, so you may have to slide a pin or small blade up the side to release it.
Check adjustment visually, and run a few low speed laps to be sure the car doesn’t connect with the rails.
Photo: Pliers pointing to one of two limiting tabs on the flux collector. Bend up slightly to lower the collector and the magnet.
(Photo of chassis and flux collector detail)
A note on rear wheels, tires, specialty axles.
Super Mangna-Traction have a standard type gear setup, no special actions or coasting. The various specialty chassis axles allow for reversed motor direction and different actions depending on what variation you have. They also allow the cars to coast.
If you decide to remove the rear axle, be very careful. Most have a tiny clutch pin running through the axle that activates the back side of the slip gear/s. Once out of the car, the gears may move along the axle allowing this pin to fall out. It’s tiny and the odds of finding it if it falls out are slim. Carefully put the assembly in an eyeglass screw vial or small hobby sized Ziploc bag, especially if you want to return it to the car. Plus, it just sucks to lose original parts.
A less finicky simple axle and gear setup can be a great upgrade for smoother and more predictable performance. The rear axle is standard G-Plus or Magna-Traction/pre Magna-Traction. The Super Magna-Traction crown gear is standard G-Plus. Most of the specialty axles also used G-Plus wheels. The white five-spoke Super Magna-Traction wheels are a little wider than standard Magna-Traction/pre Magna-Traction wheels but can be replaced with them (I shave down the flange). Many varieties of axles and wheels may fit, Aurora, Tyco, and otherwise.
Truing the rear wheels (any HO slot car).
While a lot of the more advanced racers have fancy tools, the home racer doesn’t usually need them. One thing just beyond shoe adjustments and proper lubrication that’ll take most cars immediately to the next level is truing the rear wheels.
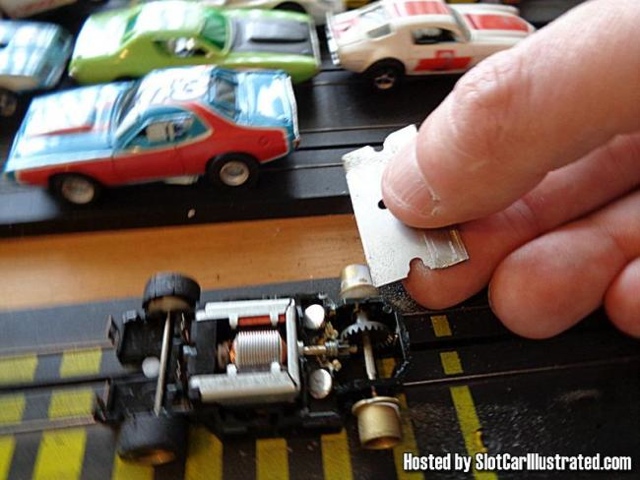
Keep fresh razor blades handy. Cheaper by the box of 100. Each blade is good for maybe 5-8 cars. Remove the rear tires and place the car on the track.
This may be tricky at first, holding the controller, the car and the razor blade. It might be easier if the car is backwards. Run the motor at 50%-80% and gently rest the blade against the spinning hub. Change angles slightly. If it doesn’t feel smooth, you should start getting shavings taking just the high parts off a little. Flip the blade over and do it again. Now the other wheel. Blow the shaving off the chassis, put your tires back on, wipe down the track with a slightly damp sponge. You’ll likely be surprised how much better the car sounds and handles. Slight fluttering sounds while running are often out of round wheels.
Caution: Don’t over do it. It’s possible to take a wheel down too far. If you spend more than 30 seconds on each wheel, that’s probably too much.
Severely out of round wheels can be bent back towards true first. I use a small crescent wrench.
You'll have to use your other hand to both hold the controller and the car (instead of a camera!). You get the idea.
Car shown is a Tyco HP7, but close enough.
The following is strictly opinion on tires, but again, might be good for the beginner on this chassis as I’ve already gone to the expense of experimenting.
I’m a big fan of Super Tires. I won’t go into a huge thing about tires here, but they’re a known shortcoming of most factory cars, especially if aged.
> For the white five-spoke SUPER MAGNA-TRACTION rears, I use Super Tires .458 for Tomy Turbo/SRT. A near perfect fit for width and slightly lower than stock height.
Also available, Super Tires .460 for AFX Magna-Traction as of 2017.
> For the wider six-spoke G-Plus wheels on this chassis, I use the above .458 or Super Tires .450 for LifeLike. Wide and low for good grip. You can also try the lower .446.
On these G-Plus style wheels, it’s important to do the razor blade thing, if nothing else, to smooth down the remnants of the sponge tires and glue.
Don’t take off too much especially on these as they are already a smaller diameter.
If you get tire slippage, a little rubber cement or some automotive belt dressing on a swab applied to the spinning bare wheel will help the tires stay in place.
That’s it.
Attention to these points will take most of the twitch out of these cars and make for stiff competition to your G-Plus cars, and blow the doors off Curverhuggers, HP2s, and many HP7s.
